Camera Software
Overview
This section introduces the camera subsystem that receives data through the MIPI CSI interface.
USB camera data is transmitted through the USB interface, which will not be discussed in this chapter. Refer to the USB chapter to learn about the use of USB cameras.
Network camera data is transmitted through the network interface, which is also not involved in the camera subsystem. Devices can receive network camera data through the GStreamer rtspsrc plugin.
The following figure shows the components of the Qualcomm camera.
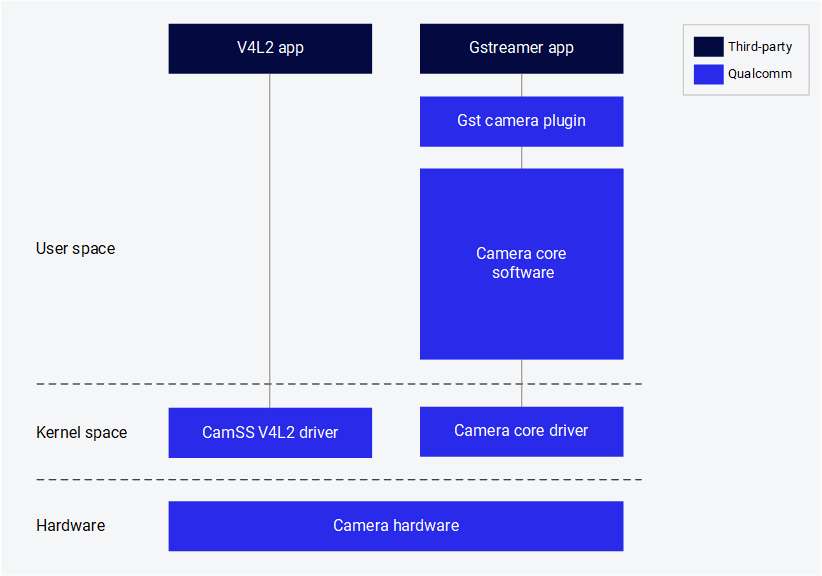
The following components are provided by Qualcomm:
| Component | Description |
|---|---|
| GST camera plugin (qtiqmmfsrc) | GStreamer plugin for Qualcomm's camera subsystem |
| Camera core software | Qualcomm's proprietary camera software, providing interfaces for developing camera sensor drivers, camera tuning, and custom software nodes |
| Camera core driver | Qualcomm camera subsystem driver in the downstream Linux kernel |
| CamSS V4L2 driver | Qualcomm camera subsystem driver in the upstream Linux kernel |
Stream cameras
Qualcomm provides a GStreamer plugin that allows application developers to interact with the Qualcomm camera subsystem.
Prerequisite
Enable the display:
sudo -i
systemctl stop gdm
sudo dpkg-reconfigure weston-autostart
export XDG_RUNTIME_DIR=/run/user/$(id -u ubuntu)
Start a single camera stream
-
Run the following command in the device terminal to start the camera with 720p at 30 FPS configuration. The frames from the camera sensor are discarded by the fakesink.
 gst-launch-1.0 -e qtiqmmfsrc name=camsrc camera=0 ! 'video/x-raw,format=NV12,\
width=1280,height=720,framerate=30/1' ! fakesink -
If the gst pipeline status changes to "PLAYING" as shown below, it indicates that the camera is running. Since this command dumps the camera frames to fakesink, no content will be saved on the device.
Setting pipeline to PAUSED ...
Pipeline is live and does not need PREROLL ...
Setting pipeline to PLAYING ...
New clock: GstSystemClock
Encode video
-
Run the following command in the device terminal to start the camera with 720p at 30 FPS configuration and save the video stream as a video file after H.264 video encoding.
gst-launch-1.0 -e qtiqmmfsrc name=camsrc camera=0 ! \
video/x-raw,format=NV12,width=1280,height=720,framerate=30/1,\
interlace-mode=progressive,colorimetry=bt601 ! v4l2h264enc \
capture-io-mode=4 output-io-mode=5 extra-controls="controls,video_bitrate=6000000,\
video_bitrate_mode=0;" ! h264parse ! mp4mux ! filesink location=/opt/mux_avc.mp4
If the gst pipeline status changes to "PLAYING", it indicates that the camera is running.
-
/opt/mux_avc.mp4 is generated on the device. Copy the recorded content from the device by running the following scp command on the host PC:
$ scp -r root@[ip-addr]:/opt/mux_avc.mp4 .
Encode video and take photos
-
Run the following command in the device terminal:
gst-pipeline-app -e qtiqmmfsrc name=camsrc camera=0 ! \
video/x-raw,format=NV12,width=1280,height=720,framerate=30/1,\
interlace-mode=progressive,colorimetry=bt601 ! v4l2h264enc \
capture-io-mode=4 output-io-mode=5 extra-controls="controls,video_bitrate=6000000,\
video_bitrate_mode=0;" ! h264parse ! mp4mux ! filesink location=/opt/mux_avc.mp4 \
camsrc.image_1 ! "image/jpeg,width=1280,height=720,framerate=30/1" \
! multifilesink location=/opt/frame%d.jpg async=false sync=true enable-last-sample=false -
Press Enter. This command will print the following menu and wait for user input.
##################################### MENU #####################################

============================== Pipeline Controls==============================
(0) NULL: Set the pipeline into NULL state
(1) READY: Set the pipeline into READY state
(2) PAUSED: Set the pipeline into PAUSED state
(3) PLAYING: Set the pipeline into PLAYING state

==================================== Other====================================
(p) Plugin Mode: Choose a plugin which to control
(q) Quit : Exit the application

Choose an option: -
Use the following menu steps to take a photo while recording the video.
(1) ready -> (3) Playing -> (p)Plugin Mode : Select (8)camerasrc -> (37) capture-image -> (1): still - Snapshot ->(1) Snapshot count ( 'guint' value for arg1) -
To stop the camera, press Enter, then press B to go back and press q to exit. The recorded video file and captured Document\ Home/images are saved in the /opt/ directory. Copy the recorded content from the device by running the following scp command on the host PC:
$ scp -r root@[ip-addr]:/opt/<file name> .
Preview the camera content
gst-launch-1.0 -e qtiqmmfsrc name=camsrc video_1::type=preview ! video/x-raw,format=NV12,width=1920,height=1080,framerate=30/1,interlace-mode=progressive,colorimetry=bt601 ! waylandsink fullscreen=true sync=false
This pipeline shows a single 1080p stream captured from the camera and sent to the display.

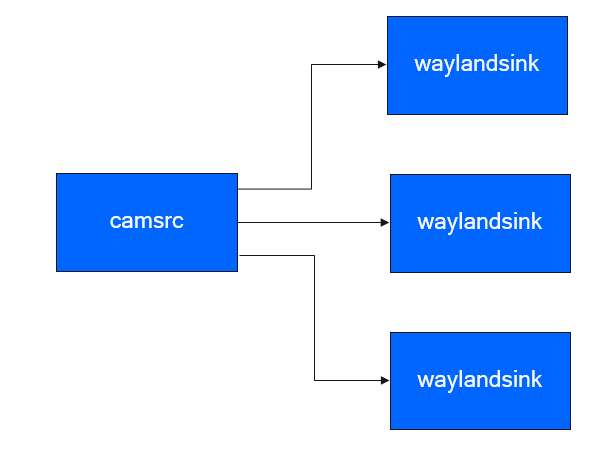
Display three 720p YUV video streams
gst-launch-1.0 -e qtivcomposer name=mixer sink_0::position="<0, 0>" sink_0::dimensions="<480, 270>" sink_1::position="<480, 0>" sink_1::dimensions="<480, 270>" sink_2::position="<960, 0>" sink_2::dimensions="<480, 270>" mixer. ! queue ! waylandsink fullscreen=true qtiqmmfsrc name=camsrc camera=0 video_0::type=preview video_1::type=video ! video/x-raw,format=NV12_Q08C,width=1280,height=720,framerate=30/1,interlace-mode=progressive,colorimetry=bt601 ! queue ! mixer. camsrc. ! video/x-raw,format=NV12,width=1280,height=720,framerate=30/1,interlace-mode=progressive,colorimetry=bt601 ! queue ! mixer. camsrc. ! video/x-raw,format=NV12,width=1280,height=720,framerate=30/1,interlace-mode=progressive,colorimetry=bt601 ! queue ! mixer.
This pipeline shows three 720p streams captured from the camera and sent to the display, with each stream being displayed in a different position on the screen.
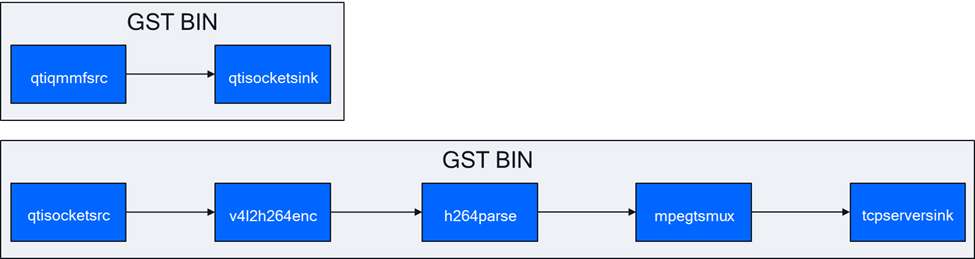
Camera stream with socket
This use case demonstrates how to store the camera stream in a socket, encode the camera stream into AVC format, and store it in a file.
In console 1:
gst-launch-1.0 -e qtisocketsrc socket=/tmp/input.sock ! video/x-raw,format=NV12,width=1920,height=1080,framerate=30/1,interlace-mode=progressive,colorimetry=bt601 ! v4l2h264enc capture-io-mode=4 output-io-mode=5 ! h264parse ! mp4mux ! queue ! filesink location=/opt/video.mp4
In console 2:
gst-launch-1.0 -e qtiqmmfsrc name=camsrc ! video/x-raw,format=NV12,width=1920,height=1080,framerate=30/1 ! qtisocketsink socket=/tmp/input.sock
The following figure shows the execution flow of the pipeline:
4K AVC and a 480p AVC streams from live source
The following pipeline encodes a 4K stream and a 1080p stream from a camera source. Each encoded data stream is multiplexed into different files.
gst-launch-1.0 -e qtiqmmfsrc name=camsrc video_0::type=preview ! video/x-raw,format=NV12_Q08C,width=3840,height=2160,framerate=30/1,interlace-mode=progressive,colorimetry=bt601 ! queue ! v4l2h264enc capture-io-mode=4 output-io-mode=5 ! queue ! h264parse ! mp4mux ! queue ! filesink location="/opt/mux1.mp4" camsrc. ! video/x-raw,format=NV12_Q08C,width=640,height=480,framerate=30/1,interlace-mode=progressive,colorimetry=bt601 ! queue ! v4l2h264enc capture-io-mode=4 output-io-mode=5 ! queue ! h264parse ! mp4mux ! queue ! filesink location="/opt/mux2.mp4"
The following figure shows the execution flow of the pipeline:
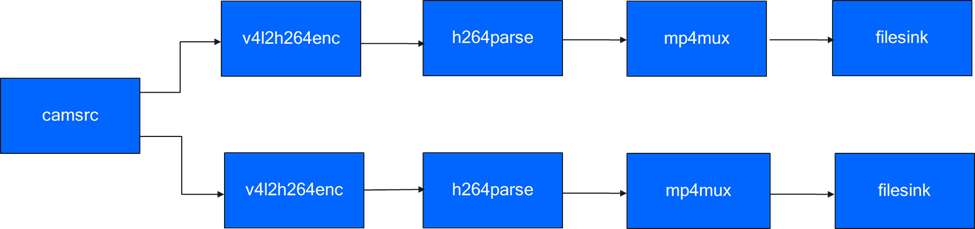
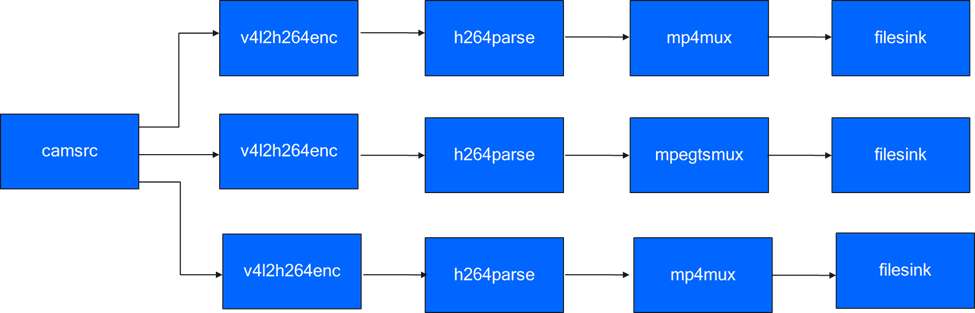
Three 1080p AVC data streams from live source
The following pipeline encodes three 1080p streams from a camera source. Each encoded data stream is multiplexed into different files.
gst-launch-1.0 -e qtiqmmfsrc name=camsrc video_0::type=preview ! video/x-raw,format=NV12_Q08C,width=1920,height=1080,framerate=30/1,interlace-mode=progressive,colorimetry=bt601 ! queue ! v4l2h264enc capture-io-mode=4 output-io-mode=5 ! queue ! h264parse ! mp4mux ! queue ! filesink location="/opt/mux1.mp4" camsrc. ! video/x-raw,format=NV12_Q08C,width=1920,height=1080,framerate=30/1,interlace-mode=progressive,colorimetry=bt601 ! queue ! v4l2h264enc capture-io-mode=4 output-io-mode=5 ! queue ! h264parse ! mp4mux ! queue ! filesink location="/opt/mux2.mp4" camsrc. ! video/x-raw,format=NV12_Q08C,width=1920,height=1080,framerate=30/1,interlace-mode=progressive,colorimetry=bt601 ! queue ! v4l2h264enc capture-io-mode=4 output-io-mode=5 ! queue ! h264parse ! mp4mux ! queue ! filesink location="/opt/mux3.mp4"
The following figure shows the execution flow of the pipeline:
Multi-camera display
The multi-camera/multi-client use cases demonstrate scenarios where multiple camera video streams are displayed in various layouts such as picture-in-picture (PiP) or side-by-side.
- Side-by-side
- Picture-in-picture
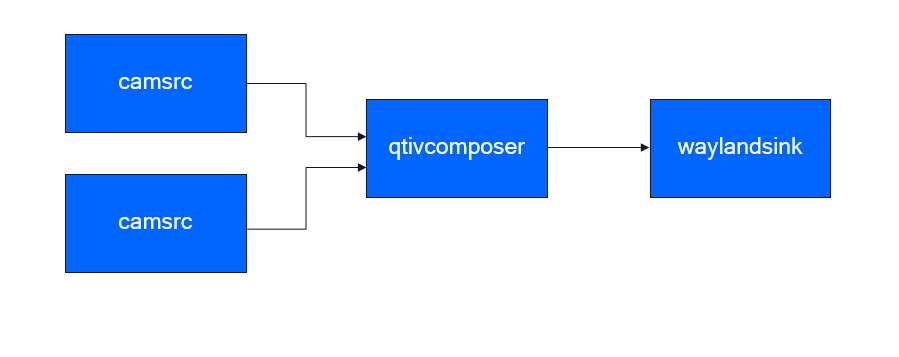
Two 720p streams - one from each camera, displayed side-by-side
The pipeline demonstrates the display of two 720p video streams, one from the main camera and one from the auxiliary camera, arranged in a side-by-side layout.
gst-launch-1.0 -e qtivcomposer name=mixer sink_0::position="<0, 0>" sink_0::dimensions="<640, 360>" sink_1::position="<640, 0>" sink_1::dimensions="<640, 360>" mixer. ! queue ! waylandsink enable-last-sample=false fullscreen=true qtiqmmfsrc name=camsrc_0 camera=0 ! video/x-raw, format=NV12, width=1280, height=720, framerate=30/1 ! mixer. qtiqmmfsrc name=camsrc_1 camera=1 ! video/x-raw, format=NV12, width=1280, height=720, framerate=30/1 ! mixer.
The following figure shows the execution flow of the pipeline:
Two 720p streams - one from each camera, displayed picture-in-picture
The pipeline demonstrates the display of two 720p video streams, one from the main camera and one from the auxiliary camera, arranged in a picture-in-picture layout.
gst-launch-1.0 -e qtivcomposer name=mixer sink_0::position="<0, 0>" sink_0::dimensions="<1280, 720>" sink_1::position="<590, 310>" sink_1::dimensions="<640, 360>" mixer. ! queue ! waylandsink enable-last-sample=false fullscreen=true qtiqmmfsrc name=camsrc_0 camera=0 ! video/x-raw, format=NV12, width=1280, height=720, framerate=30/1 ! mixer. qtiqmmfsrc name=camsrc_1 camera=1 ! video/x-raw, format=NV12, width=1280, height=720, framerate=30/1 ! mixer.
Transform and transcode
The following use case demonstrate the process of adjusting the scene in a camera.
Rotation
This use case demonstrates rotating the scene from the camera by 180 degrees. The rotated image is displayed on a local display.
gst-launch-1.0 -e qtiqmmfsrc name=camsrc video_0::type=video video_1::type=preview ! video/x-raw,format=NV12,width=1920,height=1080,framerate=30/1 ! qtivtransform engine=gles rotate=180 ! waylandsink fullscreen=true async=false sync=false
The following figure shows the execution flow of the pipeline:
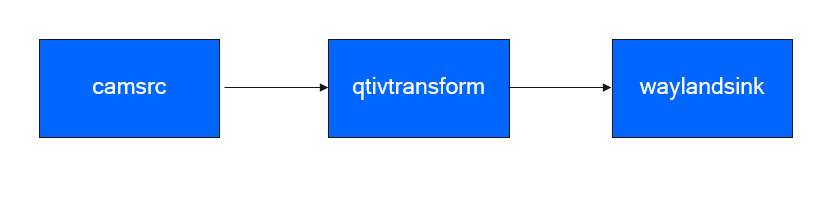
Currently, only 180-degree rotation is supported.
Horizontal flip
gst-launch-1.0 -e qtiqmmfsrc name=camsrc video_0::type=video video_1::type=preview ! video/x-raw,format=NV12,width=1920,height=1080,framerate=30/1 ! qtivtransform engine=gles flip-horizontal=true ! waylandsink fullscreen=true
Vertical flip
gst-launch-1.0 -e qtiqmmfsrc name=camsrc video_0::type=video video_1::type=preview ! video/x-raw,format=NV12,width=1920,height=1080,framerate=30/1 ! qtivtransform engine=gles flip-vertical=true ! waylandsink fullscreen=true
Troubleshooting
If the camera is unable to display or capture images, check the following:
-
Check the camera module connection based on [Connect the camera cable](Document\ Home/2.peripherals-and-interfaces/3.csi.md#cameracable)
-
Check the sensor probe.
-
Run the following command to collect logs.
journalctl -f > /opt/log.txt -
Search the logs for "probe success". "Probe success" indicates that the camera module has been powered on and is responding to I2C control. If a specific sensor does not have the "probe success" log, the issue may lie in the flexible cable connection or the camera module hardware.
The following log indicates that an IMX477 has been detected:
[ 80.645992] CAM_INFO: CAM-SENSOR: cam_sensor_driver_cmd: 939: Probe success,slot:7,slave_addr:0x34,sensor_id:0x477, is always on: 0
-
-
Check the camera sensor driver command.
-
Collect the logs using the
journalctl -f > /opt/log.txtcommand. -
Search for "cam_sensor_driver_cmd".
-
"CAM_START_DEV Success" indicates that the camera sensor streaming has started.
-
"CAM_STOP_DEV Success" indicates that the camera sensor streaming has stopped.
-
For example:
start:
[   81.172814] CAM_INFO: CAM-SENSOR: cam_sensor_driver_cmd: 1129: CAM_START_DEV Success, sensor_id:0x477,sensor_slave_addr:0x34
stop:
[ 88.905241] CAM_INFO: CAM-SENSOR: cam_sensor_driver_cmd: 1157: CAM_STOP_DEV Success, sensor_id:0x477,sensor_slave_addr:0x34 -
-
Check the sensor streaming.
-
Enable CSID SOF/EOF IRQ logging, then execute the camera streaming command.
mount -o rw,remount /usr
mount -t debugfs none /sys/kernel/debug/
echo 0x8 > /sys/module/camera/parameters/debug_mdl
echo 3 >/sys/kernel/debug/camera_ife/ife_csid_debug
echo 1 > /sys/kernel/tracing/tracing_on
echo 1 > /sys/kernel/tracing/events/camera/cam_log_debug/enable
echo 2 > /sys/module/camera/parameters/debug_type
cat /sys/kernel/tracing/trace_pipe > trace.txt -
The captured logs can provide detailed information about the SOF and EOF. Search for "irq_status_ipp" in the log file trace.txt.
-
BIT12(0x1000) indicates the SOF data packet.
-
BIT9(0x200) indicates the EOF data packet.
The logs are as follows:
<idle>-0       [000] d.h1. 19287.546764: cam_log_debug:
CAM_DBG: CAM-ISP: cam_ife_csid_irq: 4996: irq_status_ipp = 0x1110 cam-server-25604     [000] dNH.. 19287.561705: cam_log_debug:
CAM_DBG: CAM-ISP: cam_ife_csid_irq: 4996: irq_status_ipp = 0xee8 -
-